Showing posts with label costume. Show all posts

Monday, November 26, 2012

Kai (red) Ninjago Costume Tutorial

My nephew loves Ninjago. Really, what's not to like about ninjas and legos? Head over to mojoturbocostumes for detailed instructions on how to create a Ninjago costume for kids. Inspired by the Lego Ninjago toy, Kai. An inexpensive and manageable costume with minimal sewing skills. Leave a comment if you make this, I'd love to see pictures.

Enjoy!

Thursday, November 1, 2012

Peter Pan - Peter Costume Tutorial

I love this simple Peter Pan Costume from mojoturbocostumes. Check out his site for some great close up photos and detailed instructions on how to make this yourself.

Wednesday, October 31, 2012

Lemon Meringue - Strawberry Shortcake Costumes


A while back I posted about the birthday party that inspired this Lemon Meringue dress. Unfortunately, I did not include very many pictures of it at the time, so I'd like to take this opportunity to share it with you in detail.


This is the Lemon Meringue character image that inspired this dress.
This dress style lends itself to using left over fabric to embellish, which is what I did. Lots of ruffles.

The peplumbs were borrowed from our Cinderella pattern. I appliqued yellow tear shaped spots on the peplumbs to make them look like lemon slices. The skirt is a gathered rectangle 2.5-3x the measurement around the child. Cropped sleeves and a zipper up the back. I bought these leggings, but these would work as well. I settled on some yellow jelly shoes.


Tick Tock Crocodile - Peter Pan Costumes

This year, our son wanted to be Tick Tock the crocodile from Peter Pan. I spent a good deal of time researching other alligator or crocodile costumes and came to the conclusion that they all look like a dinosaur or some lizard man from an old space movie. My first piece to tackle was how to make the tail. I discovered this Etsy Crocodile costume which I liked alot.


First, I bought 2 shades of camo green fleece, along with a tan and a smidgen of white. I made these overalls (page 13)(or try this romper adaptation) in the lighter green. I made the tail and hand stitched it to the backside with extra spines in the darker green up the back.

The hood I debated about forever. To do it or not to do it. Over the top style or go simple. I decided to go with a combination of both. I found this simple hood pattern and I elaborated on it by adding the upper and lower lip and some spines to the back. The hood is lined in tan fabric and all around the mouth is a trim of white fleece and white stiff felt. The stiff felt helps hold the shape nicely. I cut shallow in some spots and others formed teeth.

The eyes are circles of white fleece I gathered, stuffed and sewed buttons to. I covered them with a scrap of green and stuffed it. I even hand stitched a grove down the top to make the eyes appear more separated.


To top it off, I wanted green leggings and a long sleeve shirt to wear underneath, which I could not find. However, I did find a camo pajama set for ten dollars, woo hoo. The best part is, once you take off the costume, he's already dressed for bed.

Friday, October 26, 2012

Costume Too Small? Make An Alteration

This was a quick fix for a costume that was ordered and turned out to be too small. So sad! So, what do you do when there isn't enough time to send it back? We make an alteration. 

I used the pattern shape above from a formal dress pattern. I then cut two panels out of some black fabric. I went with black because I didn't want to risk getting an orange fabric that did not match perfectly, thus looking obviously altered. I seam ripped the zipper out past the waist, but not completely out.  


I made about 12 loops for each side and sewed them in at the alteration site. Then, I followed the "installing a zipper" instructions to close up the addition. Obviously, I didn't use all the addition. Just enough to make the dress comfortable. Once complete, have the model wear the dress inside out and pin it closed. I left a little room so that when it gets laced up it can still pull in a bit to make it more form fitting. Then finish with  Zipper manufacturing instructions.


Thursday, October 4, 2012

Peter Pan - Wendy Costume


I have a daughter who is going to be Tinker Bell for Halloween. So, I thought we could have a family theme around Peter Pan. I'll be Wendy and my son will be the Crocodile. This Wendy costume was oh-so-simple and inexpensive. Especially when I found the fabric in the bargain bin. Try and get a heavy drappey type fabric. This dress is modifying a ballet pattern - Simplicity 5138 Style A. Modifying the shoulder (taking out the spaghetti strap) and adding a puffy sleeve with elastic. There is NO zipper or buttons. Elastic at the empire, with lining at the bust. Add a bit of Pixie Dust, think happy thoughts and you're off!


Monday, October 1, 2012

Rainbow Brite and Twink

I wish I had seen this costume when my kids were super small. Rainbow Brite was my favorite character when I was young. So much so, that I remember  having a discussion with my mom about wanting to change me name legally to Rainbow Brite. Why not? It is the coolest name ever!

Willy Wonka kids costume


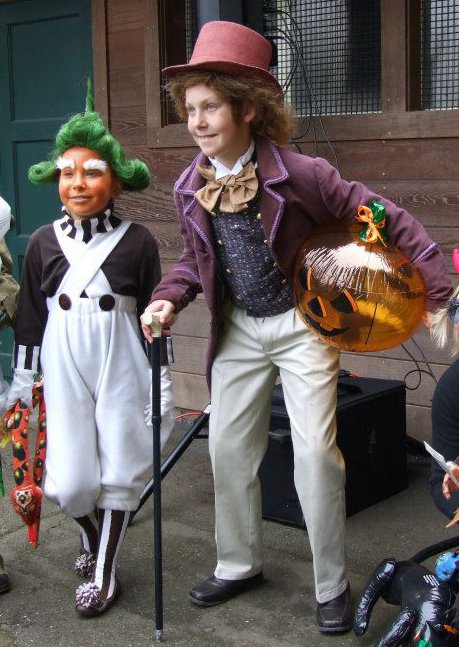
I love this version of Willy Wonka and the Oompa Loompa. These were winners at the Sequoia Zoo costume party. I got these pics from their FB page. Wish I could have been there, these are awesome costumes. So, how you can make this costume yourself?

WONKA: First, the purple velour jacket could be a thrift store find with added trim. Second, you can use this vest pattern to create the purple floral on black vest. Any regular khakis pants along with black dress shoes. Watch this video to learn how to tie a big Tan Victorian Bow tie. Finally, follow this tutorial on deviantart to create a real gentleman's top hat.  You could also make it a paper hat.

Oompa Loompa: Get or make white, fleece overalls. Get a brown turtleneck then paint white stripes at the top. Spray paint a wig green, paint the face orange and make white eyebrows. Follow the instructions on Coolest Homemade Costumes for her step-by-step instructions.
If you have a bigger group and want more Charlie and the Chocolate Factory cast members here are the other costumes.

Alice in Wonderland


I adore the new and the vintage Alice costumes.
Here is a tutorial for both the Tim Burton by googiemomma

Sunday, September 30, 2012

My Fair Lady Ascot Dress

Here is a beautiful up-cycling costume for girls. The Beautiful Ascot horse race costume from My Fair Lady, one of my favorite movies. This tutorial is here by Googiemomma. Great job.

Dr. Horrible Kids Costume

This is Awesome!
Simple, inexpensive and creative!

I see Rain Boots, Rubber Gloves, Welding Goggles
Coat is modified from Simplicity 3650 Toddler Costumes Chef E
Purchase here From poppyswickedgarden or Here are some Step by Step Pics from Starr Capps

Saturday, September 29, 2012

Dr. Who Kids Costumes

 Your Kids can't verbalize what they want to be this year? Or better yet they can and this is WHO they want to be? Check out this cool dad RDEWALT.
Or crochet an Ood Mask at Ravelry wear a suit, and join them. That's simple.
I like to see everyone join the fun. Thanks Solitaire for sharing your thrift store alterations.
I especially like the Andipose softie tutorial from imaginarybf.

Tuesday, September 4, 2012

Dorothy Costume

I know not everyone can be as lucky as me and be able to raid your mothers' closet for free fabric and then decide what to make. That is how this costume started.  I had a monkey costume for the baby and needed something to match. My mom had tons of inexpensive, blue checkered fabric. So, I modified a vintage dress pattern my mom had to make the Dorothy costume.


I made an additional bodice to attach and wear underneath. I made the middle bigger because it gathers around the neck. Don't forget the blue ric-rac around the neck and sleeves.
 She loved it and wore it for 2 Halloweens. Why bother to make her a different one, right?
My matching costume as the witch, came from a grownup pattern for Snow White, but all black.  I bought a black thrift store button up ladies blouse that looked like silk/rayon. I took off the sleeves and hemmed them. I cut the bottom to be more box shaped, like that of the tops of European castles.  I didn't get around to making the laced belt but, I was happy with how it came out.


Road Fodder

My husband is great at very simple AND comfortable costume ideas. This is an A shirt with the neck and front drenched in fake costume blood. I found this shirt at the thrift store. My husband spray painted our car tire black and then proceeded to roll over the shirt. Let it dry and voila! A costume in an hour.

Crochet Yoda Hat

I thought it would be great to show you some simple costumes that don't cost much.

Last year, I made this crochet hat for my nephew. The coat is just felt and the Yoda hat is made of homespun yarn. I used this pattern for the hat and it turned out awesome. However, I forgot the cotton around the ears. Ooops, so he is a young Yoda. I used plastic eyes instead of crochet ones. I am very pleased how it turned out.

Thanks mamaedgar for the Tutorial!

Friday, March 30, 2012

Thursday, April 14, 2011

Tutorial: Mini Jack Sparrow Costume


Mojoturbo has been working very hard on a matching Jack Sparrow costume for his son, check it out! It is coming along nicely, and they are having such a blast pretending pirates!

Monday, April 4, 2011

Tutorial: Buzz Lightyear costume


Here is a great tutorial Buzz Lightyear costume made very inexpensively and light weight.
Made from dollar adult T- shirts, camping pads, emery boards, a juice lid, plastic restaurant cups, and a pair of rain boots. Good Job Mojoturbo.

Tuesday, March 1, 2011

Princess Belle costume

For the Belle costume, I worked with Pattern Simplicity 2563. I borrowed the collar from pattern Simplicity 5520. A piece about 30" by 8.5" cut on the bias. I bought a yard of sparkle fabric. I put the collar at the furthest to the lower hand corner of the yard fabric. Then I used the pattern tissue to cut up the remaining at 8.5" high to make long bands for the lower skirt.

I had some yellow leftover fabric from making the Snow White dress. There was enough to do the top but I had to buy more for the skirt. The pattern said 2.5 yards which I thought we bought that much. I guessed wrong, I needed to go get more.


I pinned the swag on the skirt at about 8" center back and each swag to the front was an inch higher, the center front was at 12". Now feel free to adjust to suit the height of the child. I top stitched each swag down in a swag shape from each pin, plus the fabric is gathered/folded at each swag.

The skirt has (8) 15" clear elastic gathered underneath. The one at the center back is obviously shorter. Starting at the seams and darts of the upper bodice and centered down the swags, stopping at the 2.5" hem. The skirt pattern on this dress is super long. I used the 18m size skirt with the size 3T bodice. This was for my 3 year old daughter. I suggest using a dress size that fits her or measure your child to see which length works for you.

Wednesday, February 9, 2011

Sleeping Beauty Dress


My niece wanted a Sleeping Beauty dress for her birthday. Since her birthday was coming up, I wanted to make her one. After looking at tons of pictures online, I decided the Sleeping Beauty dress didn't look much different from the Cinderella and Snow White dresses. Unfortunately, there are some not-so-great knock off patterns on the market, none by Di-ny ofcourse. So, my plan was to use the pattern I already had on hand, Simplicity 2563. I drafted the other parts by hand.

I used a straight sleeve from this pattern, but drew up the over skirt and yoke. The final result? I think it turned out better than expected, and my niece absolutely loved it. Which is the joy of being the aunt to a 3-year old.

I will post my patterns later for you to download or you can email me and I will send it to you.